Any tips or tricks to aligning the doors? Things were going good, I had the gaps and height ok, but I'm having problems getting the door to sit flush with the body. Tried various shims with limited success. My strikers are in nice shape, I've replaced my latches and rebuilt the hinges (new pins and bushings) so there is very little slop. The weather stipping is new, could that be contributing to the problem? Car is sitting level, no motor or trans. New body mounts and bolts. Original doors. This is my first time hanging doors, so any insight is welcome.
Door alignment
- Thread starter Wile E
- Start date
You are using an out of date browser. It may not display this or other websites correctly.
You should upgrade or use an alternative browser.
You should upgrade or use an alternative browser.
hey wile E,when you say"door to sit flush w/the body"u mean the door is in or out compared to the quarter panel?if this is the case then you need to adjust the striker.that regulates the where the door stops.any time i hang a hood or door i remove the striker or latch,this way nothing will dictate where the panel will go when closed.new weather striping maybe a bit stiff and make it seem like the striker needs to be pulled out.also roll the window down,that maybe pushing it out.let me know how it goes.
I adjusted the striker in as far as possible, that did not help enough so I removed it to see how far the door would go in while applying pressure. No difference. Door sticks out from the body about 3/8" or more. I'm sure I'm just overlooking something simple. Door glass is not installed. I'm starting to think its the weatherstripping.
Wile E, just put my doors back on last fall before it went into storage. The guy that painted it it for me helped and made it look easy. Before it went in for body work I struggled for weeks to get it just right. I had put new skins on so everything had been apart. Anyway, he left the striker off until after it was adjusted close. It is much easier w/two people instead of alone. He also wanted to do it w/weather strip off. He started two bolts in each hinge side while I just held up the back. The fenders were off yet at this point. He's a bigger guy so lifting the front alittle at a time seemed to be what he did until it was close. He wanted to leave the top/back of the door about 1/4" higher than the quarter to allow for the added weight of the regulator and glass later on. 3/8" does sound like alot, should be about an 1/8" to prevent air from rushing into the gap. The inner rubber bumpers aren't interfering? That would be to obvious. All the door and body edges were taped off to prevent damage to the new paint. Hope this helps.......good luck!!
Steve
Steve
You didn't mention if it was w/both doors or just one. I've noticed on mine and several other malibus I looked at that the gap between the top of the door and the "A" pillar is usually wider on the driver's side than the passenger side. I couldn't adjust the driver's side as close as the passenger side. Don't know if it's a design flaw or what. I think I could adjust the pass. side to a 1/4"- 3/8" gap. The drivers gap had to be about 1/4" more. If that's your problem door maybe it's pinching close to the hinge end of the door because the door is alittle to close to the body on that end. Just an observation, hope it helps. Take a break, it'll go better later [-o<
Steve
Steve
I just went through the door adjustment/weatherstripping exercise while reassembling my car. I adjust doors without the weatherstrips and then install the rubber. The Metro supersoft weatherstrip kit I recieved did not fit as well as I would have liked it to and the rubber is not as spongy as the original seal was on the ends. If I had not adjusted the doors first it would be almost impossible to do it after the rubber was installed if the seals were used "out of the box". I had to cut sections of the rubber off of both the door and window gaskets to make them fit well enough to allow closing the door without body slamming it.
If you installed the gaskets before the door was aligned and used the same kit I recieved you wouldn't be able to get the rear of the door door aligned flush with the rear quarter. The rubber is too hard and would prevent the latch from fully engaging on the striker. If you can close the door easily and the rear of the door is flush but the front doesn't line up with the fender then your problem is probably the alignment of the front fender. Usually, no shims are required to align doors. The only spacers that might be needed would be washers for the striker.
If you installed the gaskets before the door was aligned and used the same kit I recieved you wouldn't be able to get the rear of the door door aligned flush with the rear quarter. The rubber is too hard and would prevent the latch from fully engaging on the striker. If you can close the door easily and the rear of the door is flush but the front doesn't line up with the fender then your problem is probably the alignment of the front fender. Usually, no shims are required to align doors. The only spacers that might be needed would be washers for the striker.
EXACTLY what I am dealing with. Not to impressed with the Metro "Supersoft". The ends, where the seal meets up near the front of the door looks like it may require lots of trimming, but that's just the beginning. It's the bottom rear of the passenger side door that is giving me the most trouble. I hate the idea of cutting up brand new weatherstripping. But I've come this far, So If I have to, I'll try some different weathersrtipping. What a waste.NOT A TA said:I just went through the door adjustment/weatherstripping exercise while reassembling my car. I adjust doors without the weatherstrips and then install the rubber. The Metro supersoft weatherstrip kit I recieved did not fit as well as I would have liked it to and the rubber is not as spongy as the original seal was on the ends. If I had not adjusted the doors first it would be almost impossible to do it after the rubber was installed if the seals were used "out of the box". I had to cut sections of the rubber off of both the door and window gaskets to make them fit well enough to allow closing the door without body slamming it.
If you installed the gaskets before the door was aligned and used the same kit I recieved you wouldn't be able to get the rear of the door door aligned flush with the rear quarter. The rubber is too hard and would prevent the latch from fully engaging on the striker. If you can close the door easily and the rear of the door is flush but the front doesn't line up with the fender then your problem is probably the alignment of the front fender. Usually, no shims are required to align doors. The only spacers that might be needed would be washers for the striker.
You are experiencing the same weatherstrip problem I had then. If you can gently remove the weatherstrip and align the door you'll be better off in the long run. It seems like that would take longer but it's probably your best bet. Use a forked tool to pry the plastic push clips out of the door so you don't tear the rubber molding. Align the door and then install the seals.
When you reinstall the rubber you'll find that trimming the section of the upper front (by the cowl) on the backside (where it touches the door)so that the rubber contour matches the contour of the door sheetmetal better will make a huge difference. Also you'll probably want to trim the rubber so it doesn't stick up above the door in the little corner (you'll see). Once you get it contoured to the door so the door doesn't bind when you close it and trimmed on the top you'll need to glue it in place with 3M weatherstrip adhesive.
The upper rear end of it also needs to be trimmed on the back to get the gasket to stay along the edge where the last push clip is. 3M adhesive needed also here.
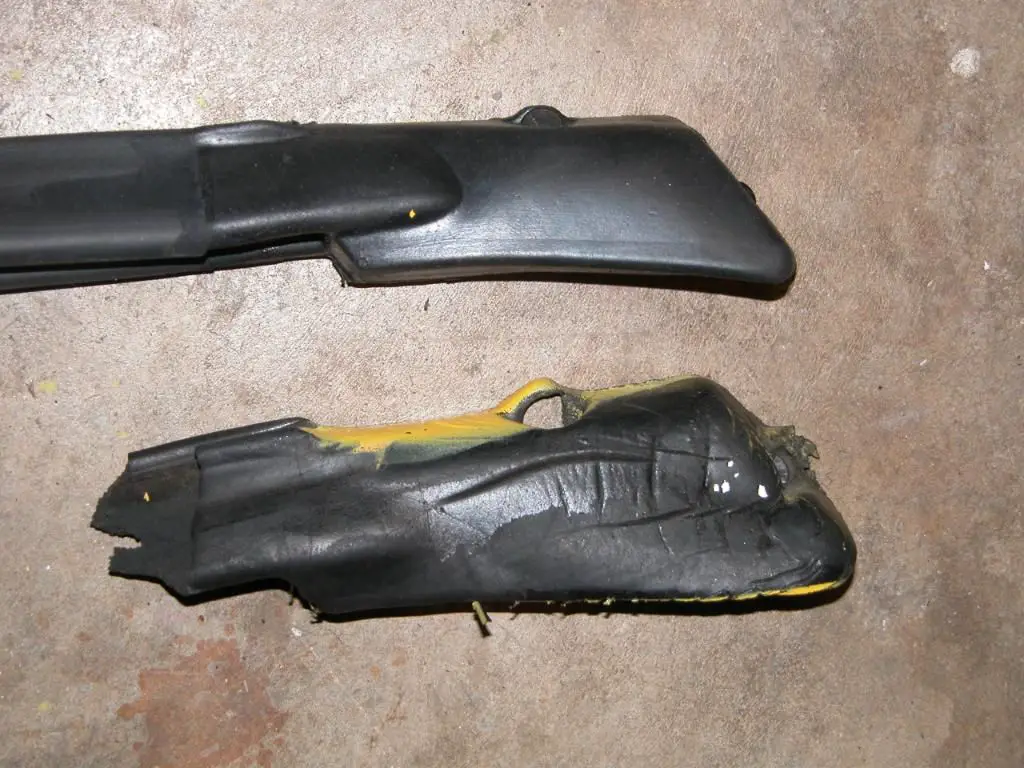
If you bought the window rubbers as well they also have fit issues on both ends. Start by installing the vertical part then work across the top and down the A pillar then trim the ends on the backside to the contours of the sheetmetal. You'll notice the original piece is made of much softer spongy material on the A pillar end. It is hard to get the new part trimmed to not cause bind so don't glue it till you're sure.
I took this pic when I was doing mine to show the difference in the way the new part is molded compared with the original. The fact that the new part is made with a much harded rubber compound makes it worse.
When you reinstall the rubber you'll find that trimming the section of the upper front (by the cowl) on the backside (where it touches the door)so that the rubber contour matches the contour of the door sheetmetal better will make a huge difference. Also you'll probably want to trim the rubber so it doesn't stick up above the door in the little corner (you'll see). Once you get it contoured to the door so the door doesn't bind when you close it and trimmed on the top you'll need to glue it in place with 3M weatherstrip adhesive.
The upper rear end of it also needs to be trimmed on the back to get the gasket to stay along the edge where the last push clip is. 3M adhesive needed also here.
If you bought the window rubbers as well they also have fit issues on both ends. Start by installing the vertical part then work across the top and down the A pillar then trim the ends on the backside to the contours of the sheetmetal. You'll notice the original piece is made of much softer spongy material on the A pillar end. It is hard to get the new part trimmed to not cause bind so don't glue it till you're sure.
I took this pic when I was doing mine to show the difference in the way the new part is molded compared with the original. The fact that the new part is made with a much harded rubber compound makes it worse.
Thanks for the insight. Downside is that after test fitting the weatherstipping (pass door) I followed the instructions and used the 3M weatherstrip adhesive all along the mouldings and clip holes. I'm skeptical it will come apart without difficulty or without destroying the weatherstripping. I'll try gently prying them off with something, but I suspect I'll be purchasing a new set. Not sure I'll go with Metro after all this.
Similar threads
- Replies
- 2
- Views
- 992
- Replies
- 1
- Views
- 950
- Replies
- 18
- Views
- 7K
- Replies
- 5
- Views
- 3K