Manual Brake Conversion with Pictures

malibudave1978

Amateur Racer
Thread starter
Jun 8, 2004
226
0
0
Houston, TX
Re: Upgraded Stock Brakes on a 1980 El Camino with Manual Br

Quick Update.

I rebled the front calipers unbolted from the spindle to try and get rid of some of the spongyness in the pedal. I did this to see if there was any more air in the system at the caliper by rotating the bleeder screw at the 12 o'clock position and bleeding the system. No air at the caliper, so I think the origanal 31 year old master cylinder has air in it or it is bad.

I am going to replace it with a new 7/8" bore master cylinder from a manual brake 1978 g-body ($60 from amazon). Though it is made of cast iron, it is the smallest bore master cylinder that readily bolts on. I know of no aluminum master cylinders that are 7/8" bore that will readily bolt on, other than one of the expensive aftermarket ones. I would also like to test a master cylinder from a Dodge Dakota. It has a 24mm bore, is aluminum, and with one brake fitting adapter, it bolts into place with the adapter plate I am using.
 

Stroked383

Amateur Racer
Dec 28, 2005
243
1
0
St louis Mo
Re: Upgraded Stock Brakes on a 1980 El Camino with Manual Br

Can you elaborate on how you made the rod to go from the pedal to the master? I'm in the process of doing this swap and want to make a secure rod. I have one of your adapter plates btw.
Thanks
Cory
 

malibudave1978

Amateur Racer
Thread starter
Jun 8, 2004
226
0
0
Houston, TX
Re: Upgraded Stock Brakes on a 1980 El Camino with Manual Br

Stroked383 said:
Can you elaborate on how you made the rod to go from the pedal to the master? I'm in the process of doing this swap and want to make a secure rod. I have one of your adapter plates btw.
Thanks
Cory

Cory,

I am not a machinist but this is the parts I initially used below and how I put together my linkage. I have since upgraded the rod end to a custom rod end designed my me. I designed my own because I wanted something that would not have the potential to fail and have a better fit on the pin (stud) with no slop.
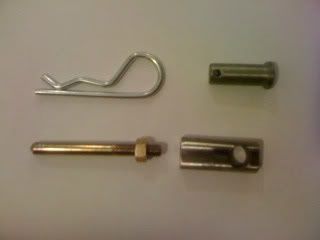
I used:
1.25" long 1/2" daimeter industrial steel pin (stud)
Matching retention pin for the steel pin above (keeps the rod end from falling off the pin (stud)
5/16-24 RH spherical industrial rod end (high quality, not home depot stuff)
5/16-24 5.0" long grade 8 bolt (this will be modified into a master cylinder brake pedal pushrod)
5/16-24 grade 8 nut (this will lock the pushrod to the rod end and lock the length into place)

ATTENTION/NOTE: I used high quality industrial type material above for the rod end and the steel pin (stud). The stud and the rod end I bought online. The Home Depot/Lowes stuff is very low quality and SHOULD NOT be used. These are your brakes used for stopping your vehicle. Failure of these braking components will cause loss of your braking system and could cause injury or death. Do this modificatin at your own risk.

IMPORTANT: Make sure you have something to retain the brake pushrod to the master cylinder. If you don't, this will cause a total loss of brakes. Make sure you retain the brake pedal pushrod to the brake pedal. If you don't, this will cause a total loss of brakes.

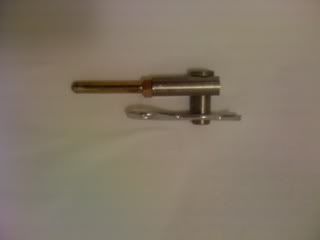
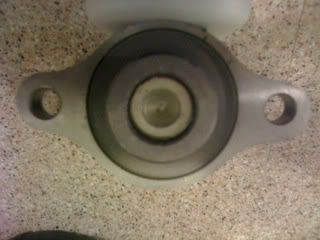
I mocked up everything on the bench by removing my brake pedal assembly from underneath the dash of the car. I used a press to install the 1.25" long 1/2" diameter pin (stud) into the top manual brake hole on the brake pedal making sure that the hole for the retention pin was not inline with the power brake pin (stud) below it. This is a press fit and the pin will not move once installed.

I next modified the 5/16-24 spherical rod end. I used a press and pressed out the spherical ball. The hole will be a little larger than the 1/2" pin (stud) after you press out the spherical ball, but it will work. I then test fit the rod end on the 1/2" pin (stud) that I pressed onto the brake pedal making sure it slid over it without too much slop.

I next bolted up the aluminum manual brake adapter plate to the brake pedal assembly on the bench starting with the two lower holes first. If you have a gasket, DO NOT use the gasket during this proceedure. Next bolt your master cylinder to the aluminum manual brake adapter plate and brake pedal assembly.

Now we have to modify the length of the 5/16-24 grade bolt and also make it into a brake pedal pushrod. Screw the 5/16-24 grade 8 nut onto the 5/16-24 grade 8 bolt to where is ALMOST bottoms out on the bolt (do not tighten at the bottom, back it off of the bottom of the threads of the bolt so it is free to turn). Now screw the 5/16-24 grade 8 bolt onto the modified 5/16-24 rod end until it bottoms out (back it off slightly so it is loose and free to turn). Install onto the brake pedal pin (stud). Install the brake pedal switch into the brake pedal and screw it in only enough so it doesn't fall out (this will give you maximum brake pedal travel). Give the brake pedal switch a small tug to verify that it is securely threaded enough to hold. With the brake pedal against the brake light switch, swing the 5/16-24 grade 8 bolt up toward and against the bottom of the master cylinder. With a permanent marker, mark the bolt where it needs to be cut.

NOTE: If you are using a master cylinder with a deep pushrod retention hole, measure the depth of this hole and add it to the mark you placed on the 5/16-24 grade 8 bolt.

Once you determined the length you need, remove the pushrod assembly off the pedal and cut the bolt where you marked it. Once cut, reinstall onto pedal and test fit. If it is still to long, remove and trim a small portion off the end and refit. Once the correct length is found, round off the end ( I used an abrasive disc). Install the pushrod assembly back on the pedal, and adjust your pushrod out to where it barely touches the master cylinder piston.

If any one has questions about this install, please email me at:

[email protected]
 

malibudave1978

Amateur Racer
Thread starter
Jun 8, 2004
226
0
0
Houston, TX
Re: Upgraded Stock Brakes on a 1980 El Camino with Manual Br

pin.jpg


From left to right:
Modified spherical rod end
Custom steel clevis designed by me to accept a 5/16" brake push rod
1.25" long, 1/2" diameter pin (stud)
Retention Pin - a little overkill, but it is easy to remove and install.

The modified spherical rod end I drilled out to 5/8" and installed a bronze bushing on the pin (stud) to take up the slop in the pedal. It worked, but it required spacers/washers also to keep the rod end from moving sideways on the pin (stud).

The custom steel clevis I designed takes out the slop and the side to side play.
 

Wile E

Dragway Regular
Aug 11, 2003
1,075
0
0
Central WISC
Re: Upgraded Stock Brakes on a 1980 El Camino with Manual Br

:shock: Oh my...the devils in the details. I'll be setting mine up shortly. After reading all this...All I can say is WOW.
malibudave1978...are you a rocket scientist?..I mean that in a good way.
 

malibudave1978

Amateur Racer
Thread starter
Jun 8, 2004
226
0
0
Houston, TX
Re: Upgraded Stock Brakes on a 1980 El Camino with Manual Br

Wile E said:
:shock: Oh my...the devils in the details. I'll be setting mine up shortly. After reading all this...All I can say is WOW.
malibudave1978...are you a rocket scientist?..I mean that in a good way.

Wile E,

Thanks for the kind words. Not a rocket scientist (far from that). It just took a lot of trial and error to find out that, eventhough the modified rod end will work, I was not satified with the fit and finish. It will work, but for the money you spend on a good rod end (that you would have to modify), it was cleaner setup to have a batch of these custom rod ends made up that worked with the 1/2" diameter pin (stud) that is pressed into the brake pedal.
 

Stroked383

Amateur Racer
Dec 28, 2005
243
1
0
St louis Mo
Re: Upgraded Stock Brakes on a 1980 El Camino with Manual Br

Great work man, you are not only helping, but saving me a TON of cash over a ready made kit.
 

malibudave1978

Amateur Racer
Thread starter
Jun 8, 2004
226
0
0
Houston, TX
Re: Upgraded Stock Brakes on a 1980 El Camino with Manual Br

I ordered a Raybestos MC39166 unit from Amazon for about $75, but it was taking 1 to 2 months for delivery, so I cancelled the order. I then went out to rockauto.com and order a Dorman unit M39166 for less than $45 with shipping.
quote]

Well the Dorman master cylinder from rockauto.com was also out of stock. Customer representative called me up to explain that there was a mistake in the system. He talked me into a Wagner unit MC101252. Roughly $65 with shipping. Hopefully it wil be here by the weekend so I can test this master, weather permitting.
 

malibudave1978

Amateur Racer
Thread starter
Jun 8, 2004
226
0
0
Houston, TX
Re: Manual Brake Conversion on a 1980 El Camino

A day after I talk with the rockauto.com representative, I recieve my Wagner 7/8" bore 1978 Chevrolet Malibu manual brake master cylinder in the mail.

See something wrong with this picture? Reservior is on backwards. I will turn it around before i bench bleed it.

78MasterCylinder.jpg


Made in the Good Ol' U. S. of A.

78MasterCylinderUSA.jpg


7/8" bore master cylinder piston with the pushrod "dimple"

78MasterCylinderPistonDimple.jpg


I pushed in the piston with a brake pedal pushrod I had laying around. Travel was a little over an inch.

Weight of Cast Iron 7/8" Manual Brake Master Cylinder
3 lbs 5 1/8 ounce

Weight of Aluminum Step Bore S-10 Master (24mm / 1 1/4" step bore)
2 lbs 8 1/4 ounce - difference of 12 7/8 ounces or a little over 3/4 lbs over the cast iron unit

Weight of an Aluminum Mopar / Strange style master cylinder
2 lbs 2 3/4 ounce - difference of 1 lb 2 3/8 ounces over the cast iron unit

I need to grind down some of the casting flash and shoot is with some aluminum color or black paint to keep it looking fresh and not like a peice of rust after about a year.
 

MalibuRacing.com Gear

Stickers & Shirts!!